This page lists my log of the Colorado 14’ers. So many books and logs I’ve seen attempt to rate the difficulty of the peaks without really giving the meaning of difficulty. The marketing blitz for the 14’ers even goes so far as to categorize them into what skiers will recognize – double black diamond for very difficult, black diamond for difficult. You cannot judge a 16-mile hike and climb of a 14,000+ ft. peak as you would a 500′ ski run. For one person, difficulty may mean how long it took to climb the mountain and how tired they were at the end of the climb. For others, like myself, difficulty is not so much the exertion of the climb, but the “fear factor” of exposure (i.e., climbing in an area where the result of a fall would mean injuries, at best).
Below I’ve listed all 55 14’ers and given my assessment of both the “fatigue factor” and the “fear factor”. As I stated, for me difficulty equates largely to the fear factor.
First, however, I can’t resist listing my “difficult peaks” – ones that are above and beyond the others. If you are new to climbing, my suggestion would be to first tackle some of the ones other than those listed below:
# 1 – Maroon Bells – two peaks with a connecting ridge. Together, with the ridge, this is one big climb. We hired a guide with 20 years of experience on the “Deadly Bells”…best decision I ever made. Still not sure if I’m crazy about a climb that has a ledge less wide than the length of my foot, however.
# 2 – Pyramid Peak – OK, so this one gets an entry on the exertion level. Nearly all of it is as steep as you will find. The last part includes some “thrilling” exposure that leaves you wondering “How in the heck am I going to get back down this mountain without some sort of embarrassing incident in my pants?”. For some reason, the trip down wasn’t nearly as bad as the trip up for me.
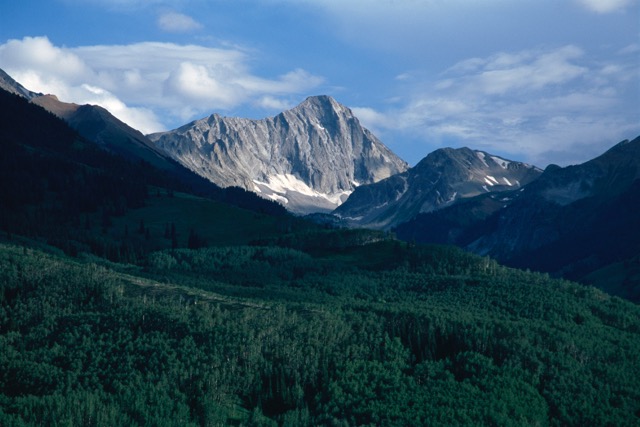
# 2 – Capitol Peak – Definitely ties with Pyramid Peak as second only to the Bells. In general, the rock is better than the Bells or Pyramid, but not always. You have to test every single hand and foot-hold. Several areas from K2 on to the summit are very exposed. This was my “break-through” climb on exposure. I felt very good on this one, and am much more comfortable with exposure nowadays. This mountain is very, very awesome to look at and nothing to mess with in bad weather. We hired the same guide for this one as we did on the Deadly Bells…2nd best decision I ever made.
# 3 – Mt. Wilson – A very fun climb and, as is typical in the San Juans and San Miguels, beauty from the top was unparalleled. The climb is strenuous, if done from the Silver Pick Basin trailhead. The last 200 ft. is quite exposed, and nothing to be messed with in bad weather.
# 3 – El Diente – Another great climb in a great location. Much snow work was necessary on July 9, 1999. The constant switching between loose rock, snow on top of rocky slabs, and exposure make for necessary caution. The summit is one of the smallest I’ve been on!
# 4 – Mt. Eolus – Intimidating just to look at. The “Sidewalk in the Sky”, with a 1-5 ft. width and 600 – 800 ft. of cliffs on either side isn’t the worse. It’s when you get beyond this that the real climb starts. This one is nothing to mess with in less than perfect weather.
Others that deserve noting are below. These are definitely more difficult than your “standard” 14’er, but certainly are do-able by the average bear. Not in any particular order:
- Longs Peak – 18 miles with some exposure. My first taste of exposure was on this mountain. I cannot tell you how many times I’ve been approached by someone wanting to start climbing mountains, and they want to start with Longs Peak. NOT! I believe this mountain holds the record for most deaths in the state.
- Wetterhorn Peak – The final several hundred feet climb to the summit (after the “Ship’s Prow” rock) is exposed and all hand and foot scrambling. We hit it when it was wet, so had to be extra cautious. The mountain is rugged and a fun climb, then you are surprised by the grassy summit. Views of Uncompaghre are stunning.
- Holy Cross – What a wonderful climb. This is pretty high on fatigue factor, as you lose 1,000 ft. on the ascent. And, guess what – that means on the descent, you have to climb that 1,000 ft. That’s just wrong!
… in descending order of altitude:
| Peak
(hyperlink to trip report) |
Altitude | Fatigue Factor | Fear Factor |
| #1 Mt. Elbert | 14,433 | moderate | none |
| #2 Mt. Massive | 14,421 | moderate | none |
| #3 Mt. Harvard | 14,420 | moderate | low with Columbia ridge, none without |
| #4 Blanca Peak | 14,345 | moderate | low |
| #5 La Plata Peak | 14,336 | moderate | none |
| #6 Uncompaghre Peak | 14,309 | low | none (if you stay away from the N. side – 1500′ of vertical!) |
| #7 Crestone Peak | 14,294 | high | moderate |
| #8 Mt. Lincoln | 14,286 | low | none |
| #9 Grays Peak | 14,270 | low | none |
| #10 Mt. Antero | 14,269 | low | none |
| #11 Torreys Peak | 14,267 | low | none |
| #12 Castle Peak | 14,265 | low | low |
| #13 Quandary Peak | 14,265 | low | none |
| #14 Mt. Evans | 14,264 | low | none |
| #15 Longs Peak | 14,255 | high | moderate |
| #16 Mt. Wilson | 14,246 | moderate | high, but only for 200′ |
| #17 Mt. Shavano | 14,229 | moderate | none |
| #18 Mt. Princeton | 14,197 | low | none |
| #19 Mt. Belford | 14,197 | low, moderate with Oxford | none |
| #20 Crestone Needle | 14,197 | moderate | moderate+ (high for novices) |
| #21 Mt. Yale | 14,196 | low | none |
| #22 Mt. Bross | 14,172 | low | none |
| #23 Kit Carson Peak
(multiple sister summits such as Kat Carson and Kitty Kat Carson) |
14,165 | high | low to moderate (moderate+ if you are descending Kat Carson) |
| #24 El Diente Peak | 14,159 | moderate | high |
| #25 Maroon Peak | 14,156 | high w/ traverse | they don’t get much higher! |
| #26 Tabeguache Mtn. | 14,155 | moderate, w/ Shavano | none |
| #27 Mt. Oxford | 14,153 | moderate, w/ Belford | none |
| #28 Mt. Sneffels | 14,150 | moderate | low |
| #29 Mt. Democrat | 14,148 | low | none |
| #30 Capitol Peak | 14,130 | high w/ backpack | high – just look! |
| #31 Pikes Peak | 14,109 | moderate, if done in a rush | none |
| #32 Snowmass Mtn. | 14,092 | moderate | low |
| #33 Mt. Eolus | 14,083 | low | high |
| #34 Windom Peak | 14,082 | low | low |
| #35 Challenger Point | 14,080 | low (from Willow Lake, high w/ Kit Carson from S. Colony) | none |
| #36 Mt. Columbia | 14,073 | moderate, w/ Harvard | none, low w/ Harvard ridge |
| #37 Missouri Mtn. | 14,067 | moderate | none |
| #38 Humboldt Peak | 14,064 | moderate | none |
| #39 Mt. Bierstadt | 14,060 | low | none |
| #40 Sunlight Peak | 14,059 | low | low |
| #41 Handies Peak | 14,048 | low | none |
| #42 Culebra Peak | 14,047 | moderate, from ranch HQ | none |
| #43 Mt. Lindsey | 14,042 | low | none, very low |
| #44 Ellingwood Peak | 14,042 | moderate | low with ridge |
| #45 Little Bear Peak | 14,037 | low | high (don’t climb with anyone above you … read up on “the bowling alley” and note the rock scars at head height as you go through it) |
| #46 Mt. Sherman | 14,036 | low | none |
| #47 Redcloud Peak | 14,034 | low | none |
| #48 Pyramid Peak | 14,018 | high | high |
| #49 Wilson Peak | 14,017 | low | low – a little the last 50′ (this is assuming the NW couloir) |
| #50 Wetterhorn Peak | 14,015 | moderate | moderate |
| #51 North Maroon Peak | 14,014 | high w/ both Bells | don’t get much higher! |
| #52 San Luis Peak | 14,014 | low to moderate | none |
| #53 Mt. Of the Holy Cross | 14,005 | high | none |
| #54 Huron Peak | 14,003 | moderate | none |
| #55 Sunshine Peak | 14,001 | low | none |
Maroon Bells: Hired a guide from Dick Jackson’s “Aspen Expeditions”, which turned out to be a very wise move. I decided in June to climb the Bells, and hired “Cardo” as our guide. We drove to Aspen, drove to Maroon Lake (after vehicles were allowed on that road – 5 p.m., I think). One of my climbing partners stared at N. Maroon and said “There’s no way…it can’t be done.” This describes the Bells. They look like an extremely steep version of the Egyptian Pyramids. To look at N. Maroon, you laugh thinking that the trail up and down is right up the East face. We met Cardo Friday at 4 a.m. We started climbing around 4:15 or 4:20. Cardo decided to take us up Maroon Peak, the southern peak, first because he liked doing the ridge from Maroon to N. Maroon better. Less exposed, he said. We climbed up Maroon Creek, then took a direct route up Maroon’s east face to an obvious saddle SE of the summit. Here, we donned helmets and climbed the West side of Maroon Peak. The west side was made up of considerably crumblier rock, and had several areas that were exposed. You have to watch what rock you grab, because it could easily come loose on you. We climbed for slightly more than an hour, going what I thought was way north of Maroon Peak. We then shot straight up to its summit. Then, the fun began. A nerve-wracking descent down the NE face of Maroon, then a sharp western turn over some really loose rock takes you to “the ridge”. From this point, you see ledges for 2000 ft. down and 500 ft. up. Cardo led us through this maze. There were many, many exposed ridges – one that had probably 200 ft. down on our left and was less wide than my foot at its narrowest. Fortunately, this was only about 25 ft. long. There was one part where we climbed a completely vertical section with ample hand and foot holds, but you didn’t know where it led to. I led this section, and thanked God when it came to a wide ledge. Cardo led us past the traditional summit approach, favoring a very narrow gully where we climbed about 1 ft. apart in case one slipped. We reached the summit, quite tired. Coming down was extremely steep, and we roped in for a 25 ft. descent down a rock chute. It was really amazing, because we were climbing down what my climbing companion had said couldn’t be done. 13 hours after our start, we reached our vehicles. The next day, we were quite sore.
San Luis Peak: Climbed July 4th, 1998. This was my first 14’er after my surgery in 11/97. I drove approximately 5 hrs. from Denver to the trailhead, hiked in about half way and set up camp on a Friday night. This was one of the most beautiful hikes I’ve ever done, as you stroll along a creek that is one beaver pond after another. I was even treated to a 5-minute beaver show. I left camp at 6:40 a.m. the next day, climbed mellow trails for about 45 minutes to the fork in the creeks. At this point, the trail takes an obvious route up an 800′, fairly steep climb, to the saddle between the west summit of Organ Mtn. and a San Luis false summit. A stroll past the false summit leads you to the summit climb, which isn’t that steep. I reached the summit at 8:50 a.m., 2hrs. and 10 minutes of climbing.
Redcloud & Sunshine: I climbed these July 19th, 1998. My family and I drove from Evergreen down to the trailhead and camped out the night before – a 7 hr. drive with two small children. The next morning, I hit the Silver Creek trailhead at 6:25 a.m. Approximately 2 hours and some change brought me 4 miles to the saddle just before Redcloud’s summit. Then, it was a slog up steep, very loose, very small scree. I summited at 9:20, and was treated to a gorgeous view of the San Juans, especially Wetterhorn, Uncompaghre and Matterhorn to the North. The book said it was 1/2 mi. to Sunshine, but it looked 1 1/2 at least. I did the traverse to Sunshine in 1 hr. While on that summit, I noticed a small cloud had built up quite high. I hurried off the summit, and was “treated” to 4 claps of thunder as the cloud built and built. Had to re-summit Redcloud to get down. Breathing a bit easier off of Redcloud’s summit, at 13,000 ft., I encountered 3 groups totaling 15 people. All but one was going on to the summit, despite the darkening skies. This was by far the fastest build-up I had ever seen, and reminded me of the most significant danger of climbing 14’ers. All in all, this was a gorgeous hike and totaled probably between 12 and 15 miles in 7 hours. Well worth the 14 hours of driving!
Humboldt Peak: This was my first peak off of the South Colony Trail. There are 4 14’ers off of this trail, and 3 of them are considered quite difficult, Humboldt not being one of them. So, I got a good look at these other three – ones that I had left to do. I did this one with a friend. We spent about 5 hrs. driving down to the road, and then spent another 1.5 hrs. driving 7 miles on one of the toughest 4-wheel drives in the state. Reaching the end of the road, we began our climb at 6:45 a.m. You climb to the S. Colony Lakes, and there are 2 routes to get to them from the road. The first is just before the creek crossing. The second is after, at the end of the road. I recommend the latter, as the first is usually quite wet, and really a creek itself if it’s just rained. 1.25 miles gets you to the lakes on the 2nd route, and there an obvious trail leads up to the saddle of Humboldt’s west ridge. From here, you have about an hour
left to gain the final 1,000 ft. to get to the summit. Avoid the temptation (and following previous routes!) to go on the North side of the West ridge. This can deposit you near some cliff’s on the peak’s northern side, and leave you cussing. Stick to the ridge proper, and you will scramble over boulders for some fun climbing to the summit. Trail to summit for us was just under 3 hrs. We encountered some rain and some pretty good snow near the top. As is usual, descend the ascent route. The view of the Crestones and Kit Carson is phenomenal from Humboldt. Bring a camera, and use it often.
Capitol Peak: Hired our Aspen Expeditions guide for this trip. Backpacked to the Capitol Lake (~9 miles from the trailhead), then climbed Capitol the next day. The climb from the lake is about an hour and is steep. From the saddle there, you go around the back side of the ridge and cross several snowfields. Then, climb west up K2. Here you will find some of the most extreme exposure on the climb. This is where you strap your helmet on. K2, while short, is exposed. Don’t miss the hole in the rocks just before exiting off of K2 – you can see several hundred feet below you – yippee! We moved on to the Knife Edge – this is about 150′ long, and is very, very thin. The exposure here isn’t as bad as the 1st part of K2, nonetheless you want to do it and get done with it! I straddled the knife edge the first half of the way, then used the good holds after that. After the Edge, we chose a traversing route to the climber’s left, avoiding the direct route to the summit which was more exposed. However, we traversed several couloirs that were very exposed and did a lot of class 4 climbing. The final approach to the summit is also quite exposed. All in all, this is the most beautiful mountain I’ve ever seen in Colorado. If you love mountains, by all means backpack the nine miles to Capitol Lake.
Mt. Sneffels: We did the Yankee Boy Basin approach. From Ouray, take the Camp Bird Mine / Imogene Pass road and follow it to Yankee Boy Basin. If you’re 4-wheeling it, drive to the sign for the Blue and Wright Lakes trails. Climb about 1 – 1.5 miles on this trail, pass Wright Lake and follow the sign to the Sneffels trail. Here, you climb the obvious Lavender Col to the saddle, swing left and climb a steep, fun gully to the summit saddle. Here, you will probably say “Where do I go now?”. The answer lies in dropping about 30′ before the final saddle and climbing a route to your left. There are a few routes, and the 2nd to last one contains the least exposure. You’ll see about 20-30′ of air below you, but you’ve got excellent hand and foot holds. From here, climb the obvious short route to the summit. A gorgeous mountain with an impressive view!
Wetterhorn: We climbed the Matterhorn Creek trail. This was about 3 miles of 4-wheeling off of the Engineer Pass road. Do NOT miss a stay in Lake City…see if you can find the bones that Alfred Packer left behind. The climb goes into the stunning Matterhorn Basin, where you don’t see Wetterhorn for a few hundred feet. Don’t miss the trail to your left that takes you off into the depths of the Basin. Follow this to the south ridge of Wetterhorn, and climb the ridge, or traverse its gullies, to the Ship’s Prow, a huge stone block that cuts the summit ridge. Do a couple of pull-ups here and get prepared for some excellent class 3 scrambling. This gully was wet for us, but the rock was good. Be careful as some of the rocks can be loose. Also, watch for moisture and climbers above you. A false step on the climb to the summit up this ridge is not advised, as the exposure is better viewed than experienced. Three hours to the summit. All in all, one of my favorites!
Handies: Climbed from the American Basin, off the Cinnamon Pass road. We climbed from the Basin trailhead, up to near the lake, then the South ridge to the summit. The trail is obvious, and tops you out with some gorgeous views to the South. One of the best views I’ve had. We did this one after Sneffels that a.m., then driving Cinnamon Pass from Ouray. We started at 4:50 p.m. with great weather, summited at 6:45, and returned to our vehicle at 7:55. This is the first time I’ve ever climbed late in the afternoon. We would have stayed for the sunset, but the clouds to the South were starting to produce moisture and electricity. Incredible views – some of the best!!
Crestone Needle: South Colony Lakes road starts this climb, of course. During Sept. 1998, myself and two others attempted this from the end of the road. We got a start at 6:10 a.m. under crystal clear skies. We climbed to the lower lake, then skirted west to Broken Hand pass. The goal is the notch with the grassy summit. Yes, you go directly up that rotten gully below it. It had some snow, but really wasn’t that bad. At the 12,900′ pass, follow the well-worn trail as you traverse towards Crestone Needle. The traverse isn’t as long as the book states – maybe 30 minutes. You come through a couple of notches and view a major couloir with a black, wet streak down the middle. The trail pretty much ends here and there are many cairns to let you know this is the route. Stay tuned, because this is where we turned around. 9:15 a.m., and the crystal clear skies had given way to high, thick clouds with 200′ visibility.
Uncompaghre: September 18, 1998 brought myself and a friend to the summit of Uncompaghre. We drove from the Denver area to the trailhead (5.25 hours) of Nellie Creek. This trail is about 4 miles west of Lake City on the Engineer Pass road. Moderate 4-wheeling for 4 miles from the Engineer Pass road gets you to the Nellie Creek trailhead. We climbed the next morning on an obvious route to Uncompaghre in 2 hours, 15 minutes. Uncompaghre Peak is the peak that comes into your view nearly directly ahead of you – to the northwest of the trail. On your left (SW) and right (NE) are much lower peaks. The trail is quite obvious – don’t take the trail over the saddle to the Big Blue Wilderness. The summit is large, and yes, the views from this peak (as the tallest peak in the San Juans) are for miles, miles and more miles. We could spot nearly every fourteener in the state, save those like Long’s Peak and Pike’s peak. This was one of the milder 14’ers as far as exertion and fear factor, but very rewarding!
Wilson Peak: We drove from Denver to the Silver Pick Basin trailhead, just outside of Telluride, June 5th – a 6.5 hr. drive. Enduring a mosquito swarm that night, we climbed Wilson Peak on the 6th. We chose the route up the West couloir, which was filled entirely with snow. The Silver Pick Basin trail had several snow crossings as well. The couloir up to the ridge was hard snow, so we had to be careful to kick solid foot steps into it. We were thankful for having our ice axes with us – this route could not have been done without them. The last 50′ out of the snow couloir was slightly exposed and contained weak rock that necessitated careful class 3 scrambling. We summited after about 3 hrs. of climbing, then enjoyed a fine glissade that dropped us back down into Silver Pick Basin.
Mt. Wilson: We did this peak from the Silver Pick Basin trailhead as well. We left the trailhead at 5:45 a.m., climbed up and over the Rock of Ages saddle and traversed around the Navajo Basin to Wilson’s north couloir. From here, we traversed the snow up to the rock rib in the middle of the two substantial couloirs. We took the right (west) of this rib but should have taken the left (east) of it.
The rock is loose and dangerous. At the top of the rib, the trail on the climber’s left is very well defined and puts you right smack dab at the crux of the climb – the backside of Mt. Wilson (the south side). While intimidating to view, its exposure does not rival the 1000′ + ft. found on many 14’ers – merely a couple of hundred (OK, so the result of a fall would be the same). It is a careful scramble using good climbing technique up the ledge rock, but only for a 150′ or 200′ elevation gain – about 10 minutes. We summited after 6 hrs. of climbing, then “enjoyed” a 4 hr. slog back to camp.
El Diente: For some strange reason, I hadn’t heard that this peak was nearly comparable in difficulty to Mt. Wilson. Just goes to show you – don’t believe anything you hear, nothing you read and only half of what you see. The half that I saw convinced me that this peak deserves as much, if not slightly more, respect than Mt. Wilson. We again left the Silver Pick trailhead at 6:10 a.m., crossed the Rock of Ages Saddle, then dropped 900′ elevation into Navajo Basin to the northern face of El Diente. As Louis Dawson recommends, we picked our snow line from the Rock of Ages saddle view, then committed it to memory. The snow was less than ideal – in general, it was too soft to give you that stable foot-hold. The last crossing below the infamous “Organ Pipes” dropped us out onto a slab of smooth rock underneath snow – yuck. A tricky friction move was required to clear this hurdle. From here, it was largely a traverse well-marked by cairns around the north side. There is some exposure on scree and taulus, so be careful. After nearly 6 hrs. of climbing, we reached the summit. Fortunately, there were only two of us – there wouldn’t have been room for anymore on top. Instead of Mt. Wilson’s 4 hr. descent, we thoroughly enjoyed a 5 hr. return trip to the trailhead – the best part of which was gaining that 900′ back to the Rock of Ages Saddle!